

Securing email communications is essential for any business that relies on digital correspondence. Adding a DKIM (DomainKeys Identified Mail) record to a domain ensures that outgoing emails are verified as authentic and haven’t been tampered with during transit.
By configuring DKIM through Google Workspace, organizations can prevent spoofing, protect their domain reputation, and improve email deliverability, keeping messages out of spam folders and trusted by recipients.
What is a DKIM Key?
A DKIM (DomainKeys Identified Mail) key is a digital signature that verifies your emails are actually coming from your domain and haven’t been altered in transit. Think of it like a wax seal on an envelope.
👉 To learn more, check out our article on DKIM keys.
Accessing Your DKIM Key in Google Workspace
If you are looking to only find your Google DKIM key to provide to a tech support person (and sometimes, that’s me! when I’m messing around in your backend DNS settings), you can do so by simply following these directions 👍
Log Into the Google Admin Console
Sign into Google Admin Console.
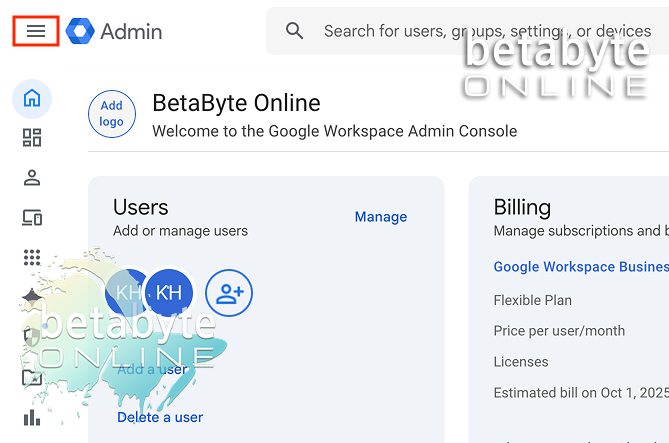
Go to the Settings Menu
Click the three lines (hamburger menu) in the upper left corner.
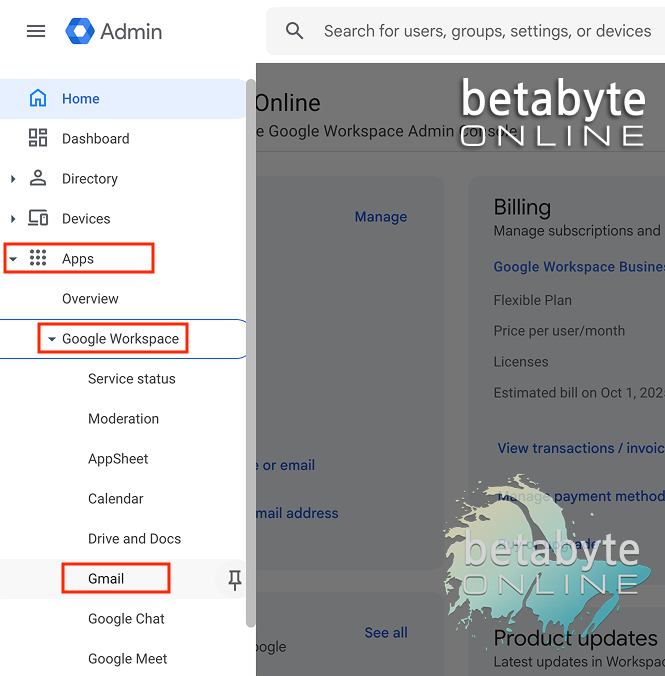
Navigate to Gmail Settings
Go to Apps > Google Workspace > Gmail.
You should now see the DKIM key for your Google Workspace authentication here.
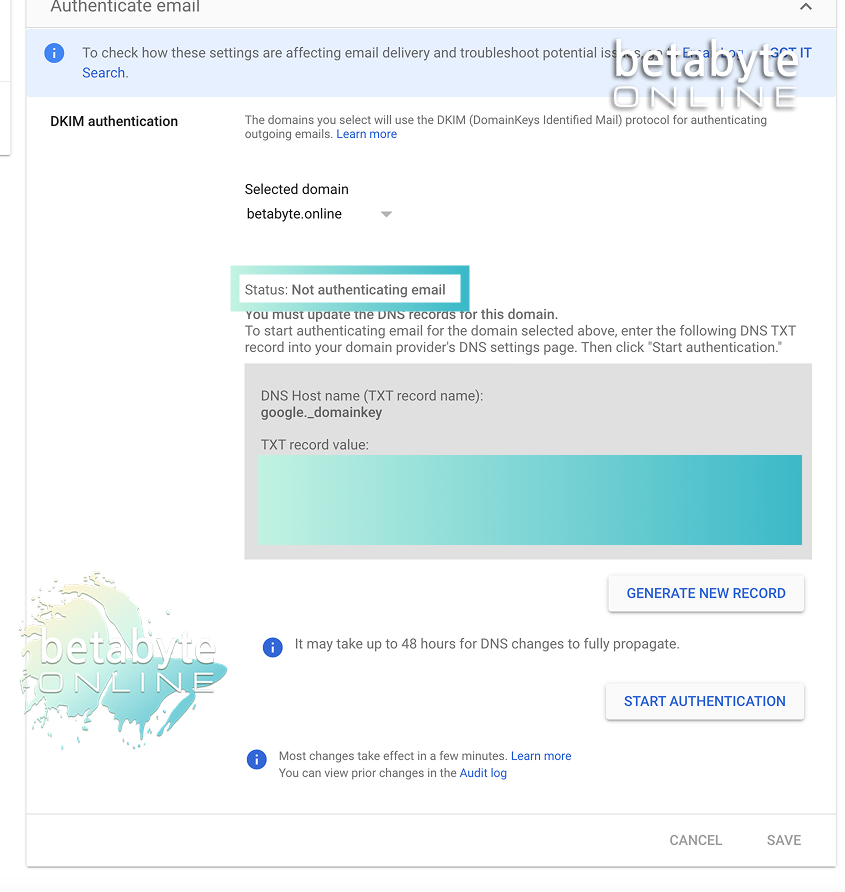
👉 You can find more specific instructions here: How to Generate a DKIM Key with Google Workspace.
Add the DKIM Key to Your Domain
After you’ve generated the DKIM key pair—which includes the DNS Host Name (aka the record name) and the TXT record value (the DKIM key itself)—the next step is to add it to your domain through your domain host provider.
In order to connect the Google Workspace DKIM key to your domain, you’ll need access to the backend DNS settings of your domain host. These settings are usually found under “Nameserver Settings,” “Manage DNS Records,” or “Add New Record.”
👉 For more specific navigation instructions, please contact your web host or domain registrar.
What is a TXT Record and How Does It Work?
A TXT record is a type of DNS entry that lets domain owners insert text-based information into their DNS settings. TXT records are commonly used to prove domain ownership (like Google site verification) or to provide security instructions (like SPF, DKIM, and DMARC).
In this article, we’re using a TXT record to connect your DKIM key from Google Workspace to your domain, so that email providers can verify that messages from your domain are authentic and not forged.
Editing DNS Settings
Sign Into Your Domain Host
Sign into your domain name host provider account and access your DNS settings.
For these instructions, we’re starting at the backend DNS settings page of your provider. For example, if your domain was originally registered at Domain.com (now partnered with Network Solutions), but your nameservers are pointing to a hosting provider like Hostinger, you’ll need to edit the DNS through Hostinger’s Manage DNS settings, not Domain.com.
Be Careful With DNS!
⚠️ Please only do this if you’re comfortable editing DNS records. One wrong character, missing record, or deletion can cause serious issues (like your email not working or even your website going down). If you’re not comfortable, reach out to us at BetaByte Online. We’ll handle it for you so you can focus on what you do best—running your business—while we connect your internet endeavors with third-party platforms. Win-win-win.
Add the TXT Record
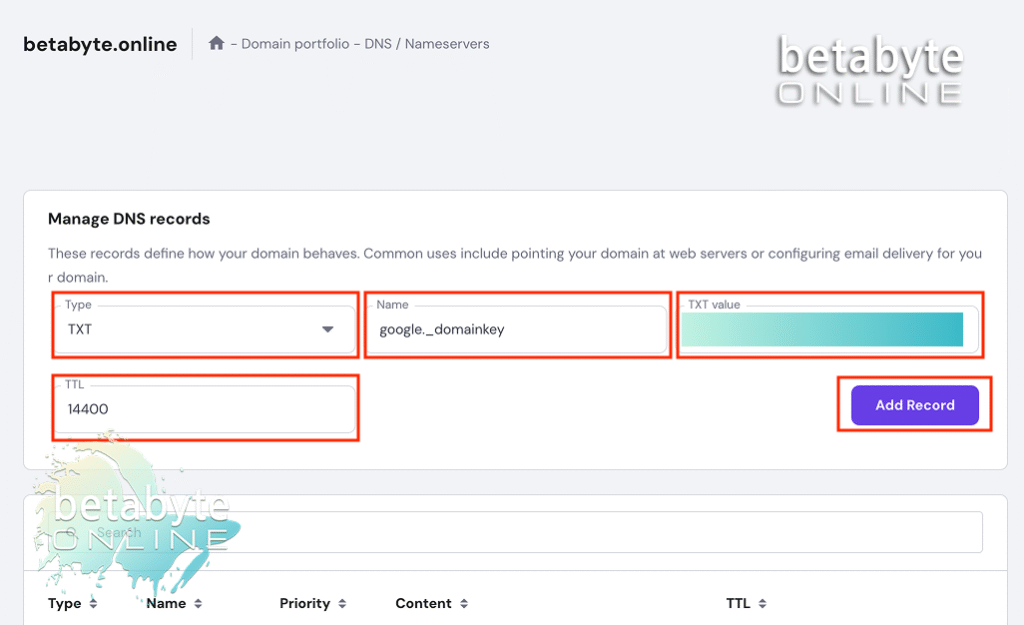
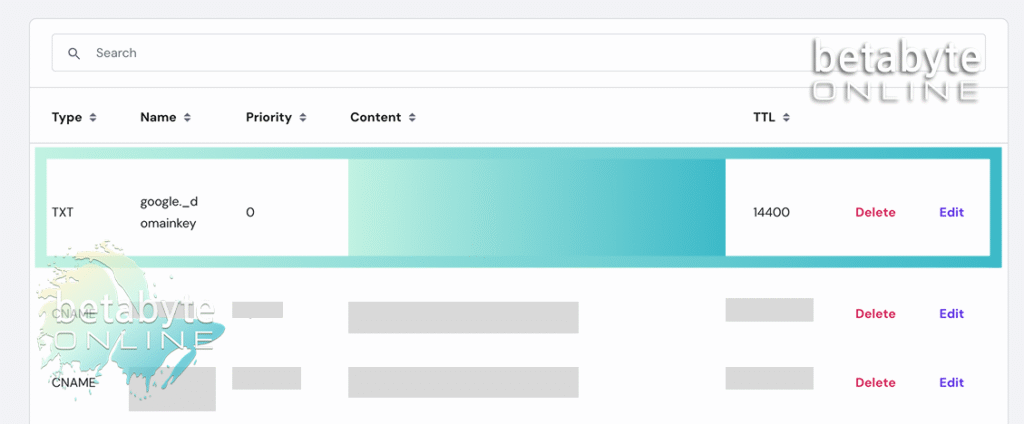
- Record Type: TXT
- Name/Host/Alias: google._domainkey
- TXT Record Value: Copy and paste the key generated in your Google Admin Console. It should start with something like:
v=DKIM1; k=rsa; p=MIIBIjANBgkqh…
Set TTL
Enter a TTL (time to live). A common default is 14,400 seconds (4 hours).
This means DNS servers will cache your DKIM record for 4 hours before refreshing. That’s a good balance because:
- It allows updates to propagate within a reasonable time if you need to change them.
- It avoids putting unnecessary strain on the system by forcing constant refreshes.
Save the Record
Once entered, save the changes and confirm the record is listed under your DNS settings.
👉 If you’re setting up DKIM for multiple domains, you’ll need to repeat this process for each one. Each domain requires a unique DKIM key generated in Google Admin Console. See our guide: Generate a New DKIM Key.
Watch Out for Conflicting TXT Records
When reviewing your DNS settings, make sure there are no conflicting TXT records. Common examples include:
- SPF Records (keep these): Example → v=spf1 include:_spf.google.com ~all
- Google Verification Records (keep these): Example → google-site-verification=abc123xyz
What you don’t want:
- Duplicate DKIM records with the same host name.
- TXT records from old email providers that conflict with your Google Workspace setup.
Ensuring Your DKIM Setup Works
Once you’ve added the DKIM record to your domain and confirmed it’s saved correctly, your emails will be authenticated and trusted by major providers like Google, Microsoft, and Yahoo. This helps prevent your messages from landing in spam, protects your domain’s reputation, and ensures your business communications are delivered reliably.
If you run into any issues or want to make sure everything is set up perfectly, reach out to us at BetaByte Online—we’ll guide you through the process so you can focus on running your business with confidence.