Why SMTP Matters for WordPress
SMTP (Simple Mail Transfer Protocol) is the standard way emails are sent across the internet. By default, WordPress tries to send emails using the built-in wp_mail() function, but this often fails because most hosting providers aren’t set up to deliver emails reliably. That’s where SMTP comes in — it ensures your emails are authenticated, trusted, and actually land in inboxes instead of being blocked or marked as spam.
At BetaByte, we’ve seen many clients run into this exact issue. One client had a contact form that seemed to work fine — users could fill it out and hit submit — but nothing ever showed up in their inbox. The emails weren’t lost, but Google flagged them as suspicious because they looked like they were being sent and received by the same domain without official verification. In other words, Google couldn’t confirm that WordPress was authorized to send emails on behalf of their domain, so the messages were quietly dropped. Installing WP Mail SMTP fixed everything.
Here’s how you can set it up so the same problem doesn’t happen to you.
Step 1: Install WP Mail SMTP
Install the Plugin
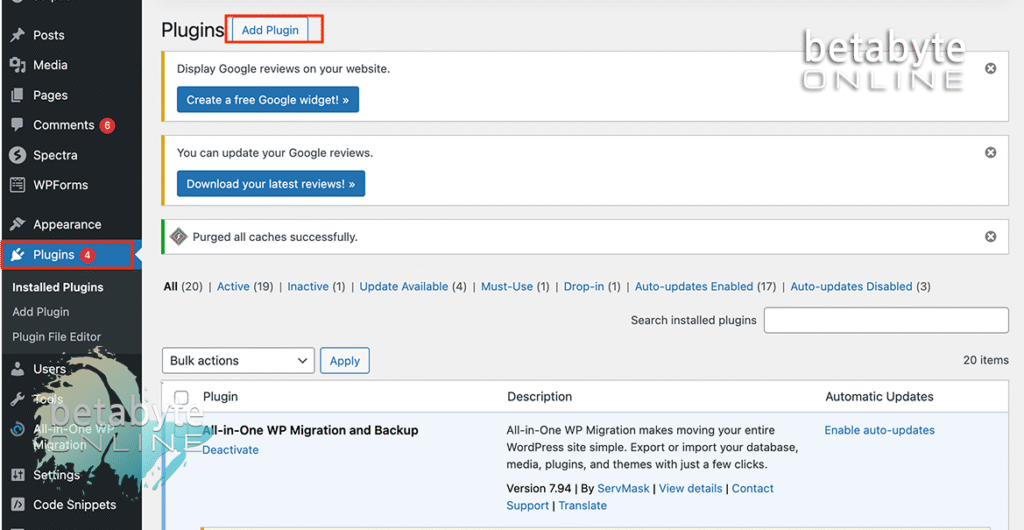
Go to your WordPress Dashboard.
Add the Plugin
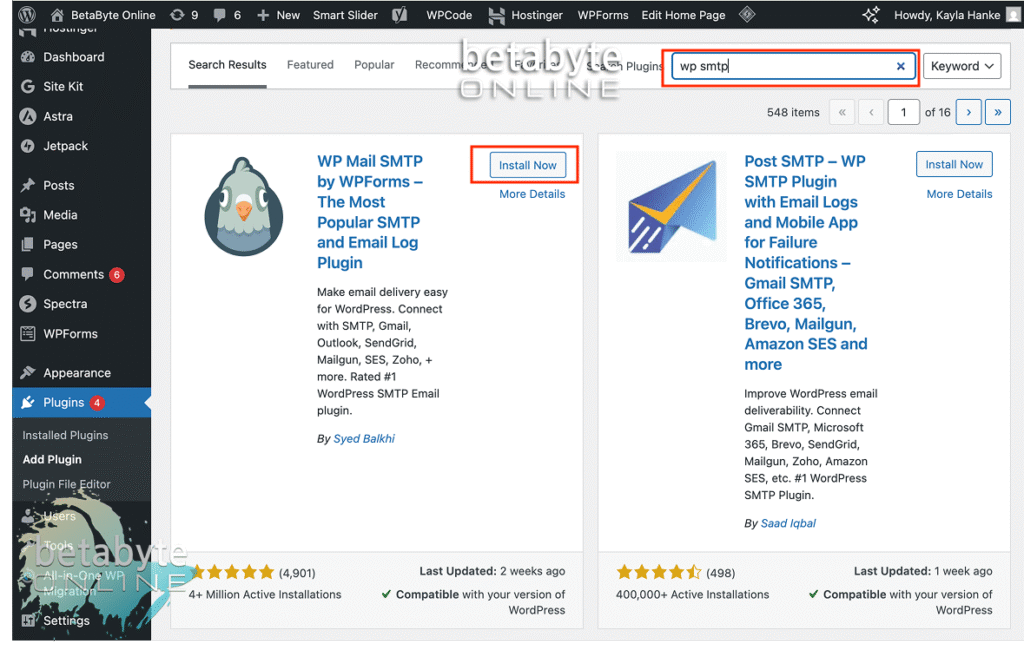
Select Plugins > Add New.
Search for WP Mail SMTP
Type “WP Mail SMTP” into the search bar.
Install and Activate
Click Install Now, then Activate.
Step 2: Configure WP Mail SMTP Settings
Verify “From Email” and “From Name”
In your WordPress Dashboard, open WP Mail SMTP > Settings.
- Enter your From Email (this should match your business email address).
- Enter your From Name (usually your company name).
- Turn on Force From Email and Force From Name.
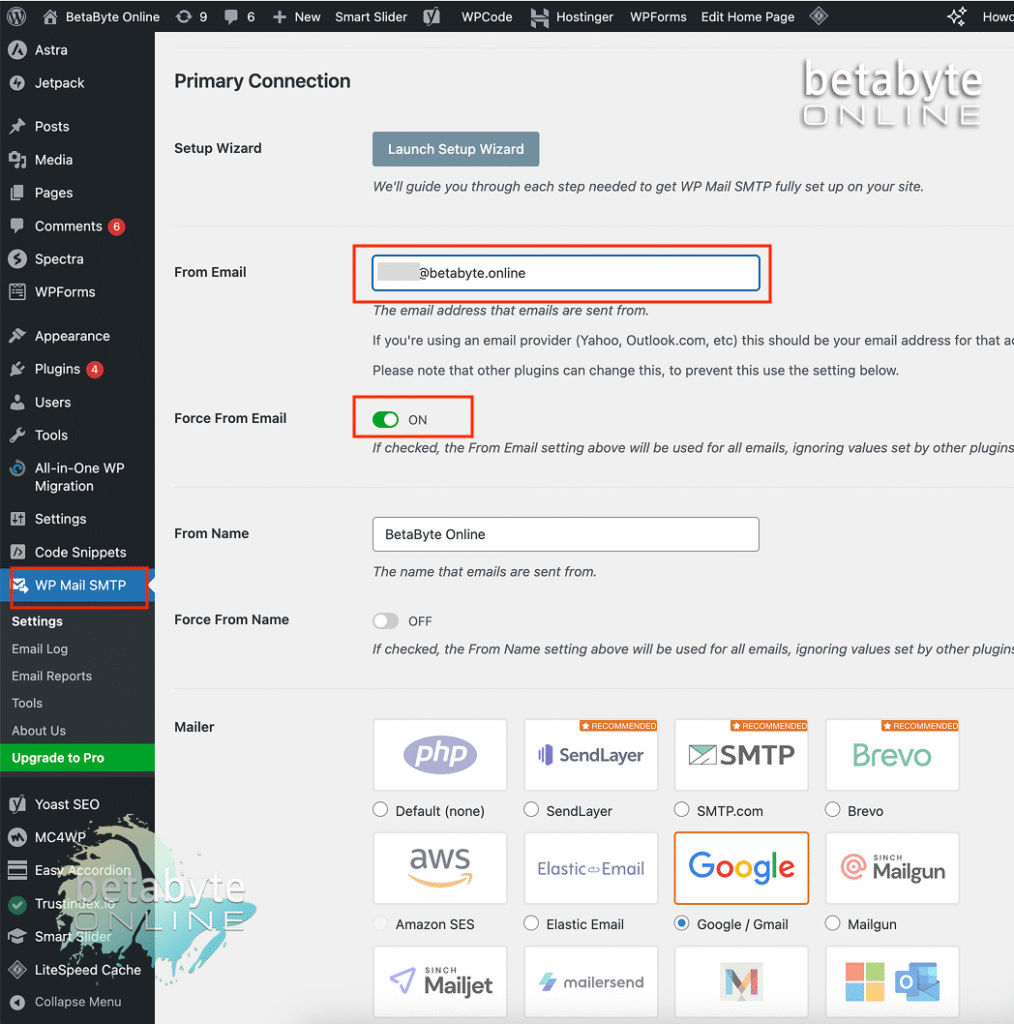
💡 Why this matters: These settings override conflicting information elsewhere in WordPress, which gives you a clean and consistent sender identity. Search engines, email servers, and especially Google do not like conflicting or redundant information. Keeping this consistent reduces errors and helps ensure your emails are delivered reliably.
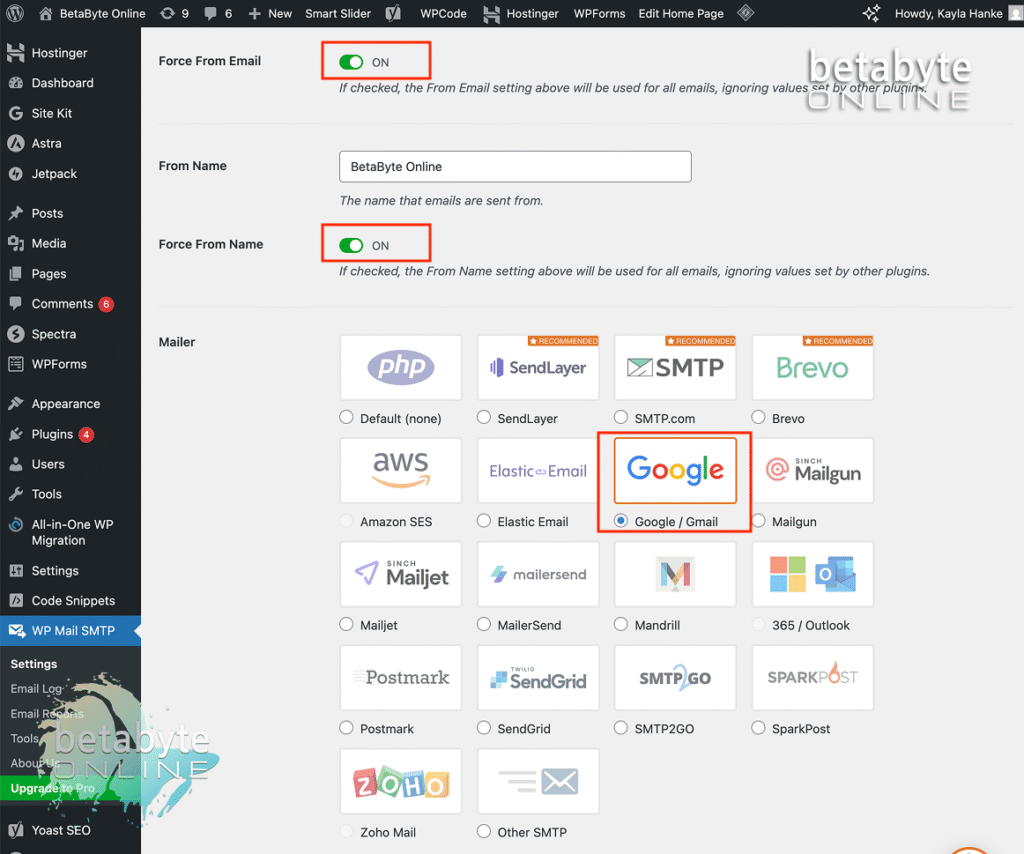
Select Your Mailer
Choose Gmail as your mailer.
This tells WP Mail SMTP to connect through your Google Workspace account.
Step 3: Gather Your Google Credentials
What You’ll Need
- Client ID
- Client Secret
You’ll also provide WP Mail SMTP’s Authorized Redirect URI to Google so the two systems can authenticate each other securely.
Step 4: Create a Google Cloud Project
Access the Google Cloud Console
Google Cloud Console Dashboard or this link: https://console.cloud.google.com/home/dashboard
Set Up a Project
- Click Select a Project.
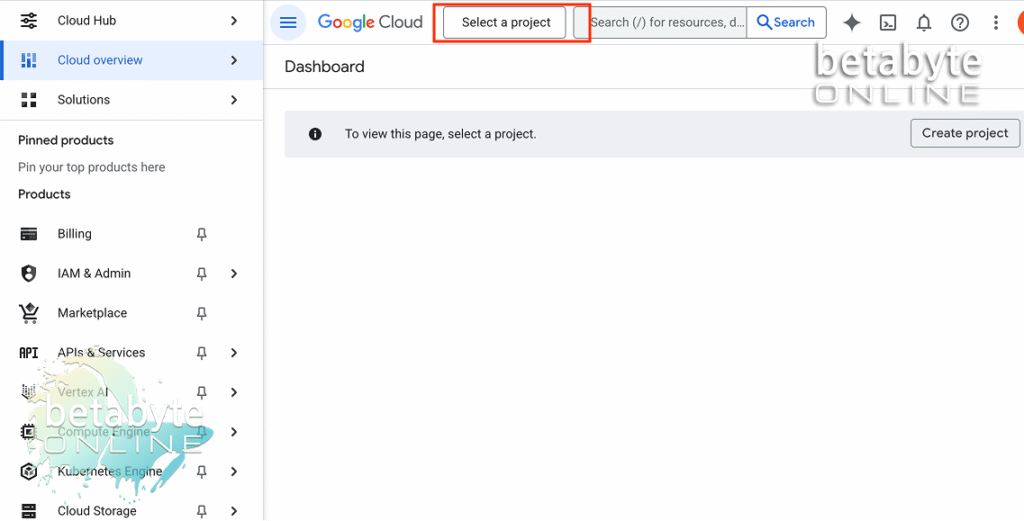
- Choose your organization.
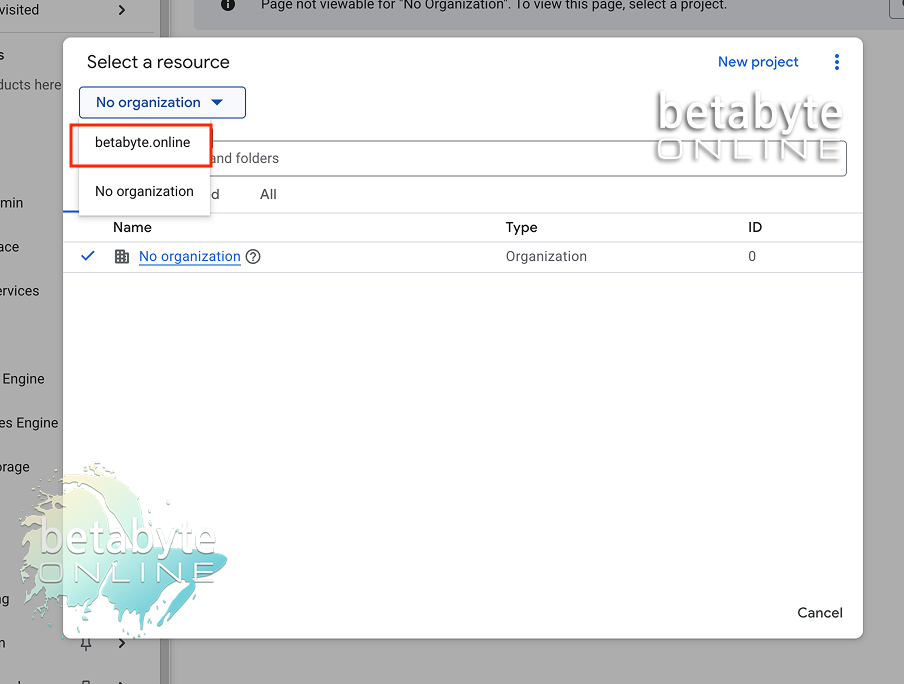
- Select an existing project or create a new one.

👉 Tip: For organization, we recommend keeping all website-related services under the same project folder. This makes it easier to manage assets and troubleshoot later without juggling multiple projects unnecessarily.
Step 5: Enable the Gmail API
Enable Gmail API
- In the left sidebar, select APIs & Services > Library.

- Search for Gmail API.

- Select it, then click Enable.

What’s an API and Why Use the Library?
An API (Application Programming Interface) is how software programs “talk” to each other. Google’s API Library is where you enable and manage those connections.
Other examples:
- Google Maps API → Embed maps on your website.
- Google reCAPTCHA API → Protect forms from spam (<u>[How to Set Up reCAPTCHA in WPForms]</u>).
- Google Drive API → Connect to stored files.
For WP Mail SMTP, the Gmail API is the one you need.
Step 6: Create Your Credentials
Choose Credential Settings
- In the Google Cloud Console, go to APIs & Services > Credentials.
- Click Create Credentials.

- Which API are you using? → Gmail API

- What data will you be accessing? → User data

Why “User Data”?
Because this integration will access information belonging to a Google user (your email address), and Google requires explicit consent to connect. This process generates an OAuth Client.
Click Next.
Step 7: Configure Your OAuth Consent Screen
Enter App Details
- App Name: Choose a simple name (e.g., “BetaByte SMTP Setup”).
- User Support Email: Use your Google Workspace email (autopopulated).

- App Logo: Optional.

- Developer Contact Information: Use your own email — you are the point of contact for this integration.
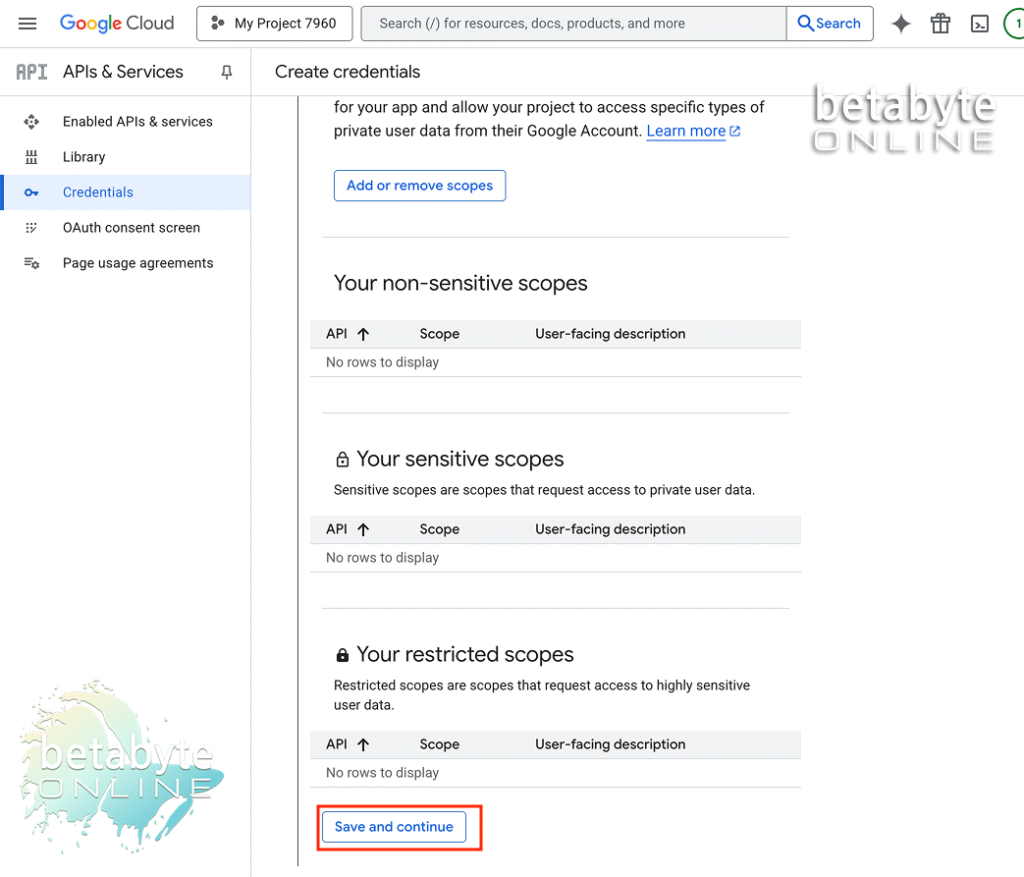
- Click Save and Continue.
Scopes (Optional)
Scopes define what kind of data your app can access. For WP Mail SMTP, the defaults are enough.
👉 If you skip this, click Save and Continue.
👉 If you ever build more advanced integrations (like syncing Google Calendar or Drive), you may revisit this section.
Step 8: Set Up OAuth Client ID
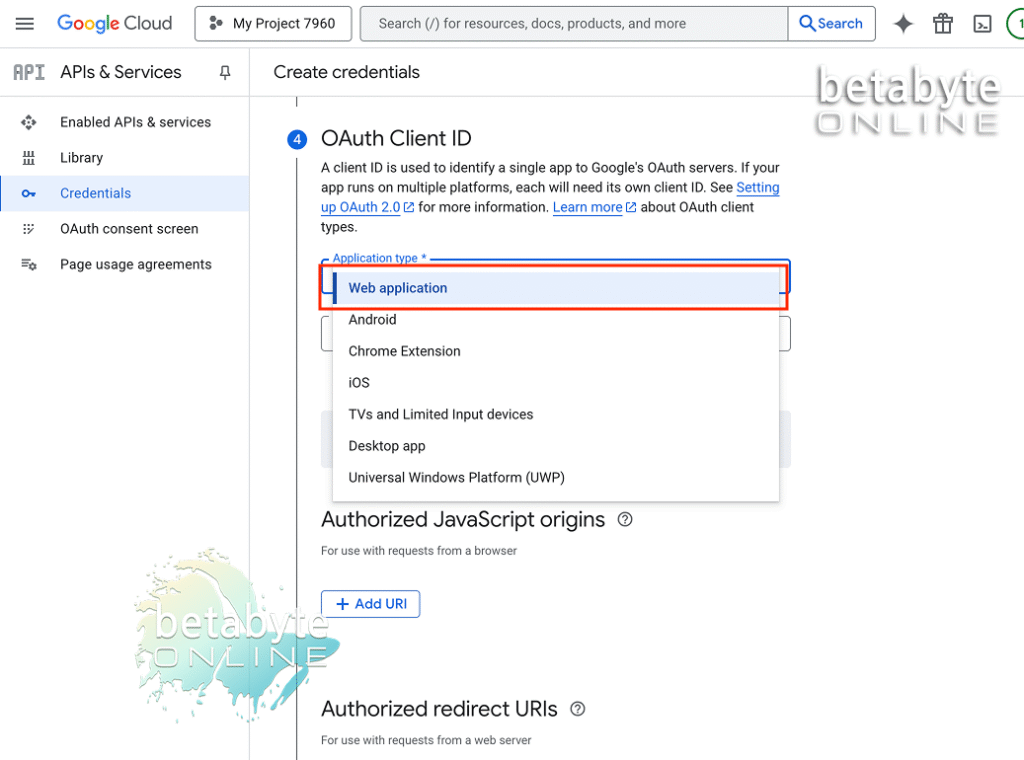
Choose Application Type
Select Web Application.
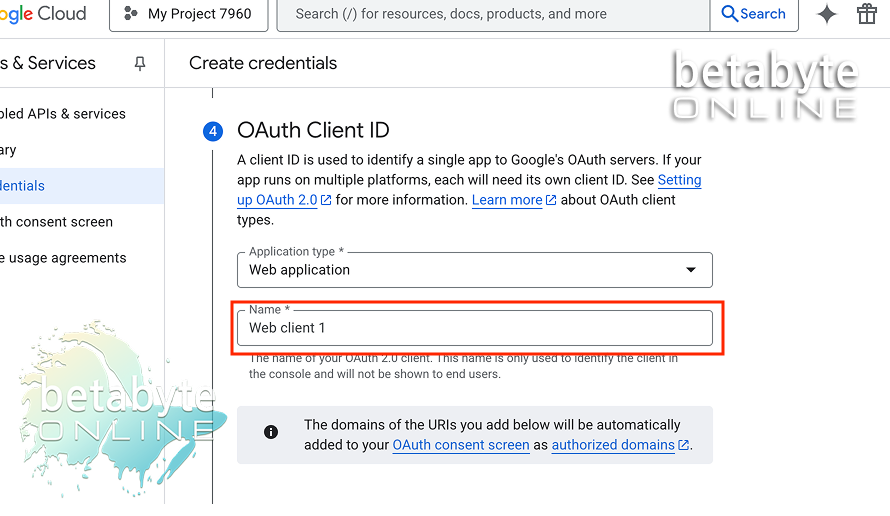
Name Your Client
Leave the default name (“Web Client 1”) or choose your own.
Add Authorized Redirect URI
- Click Add URI.

- Enter: https://connect.wpmailsmtp.com/google/
(you can also copy this from your WP Mail SMTP settings page).
- Click Create.
Step 9: Save Your Credentials
Google will generate your Client ID and Client Secret.
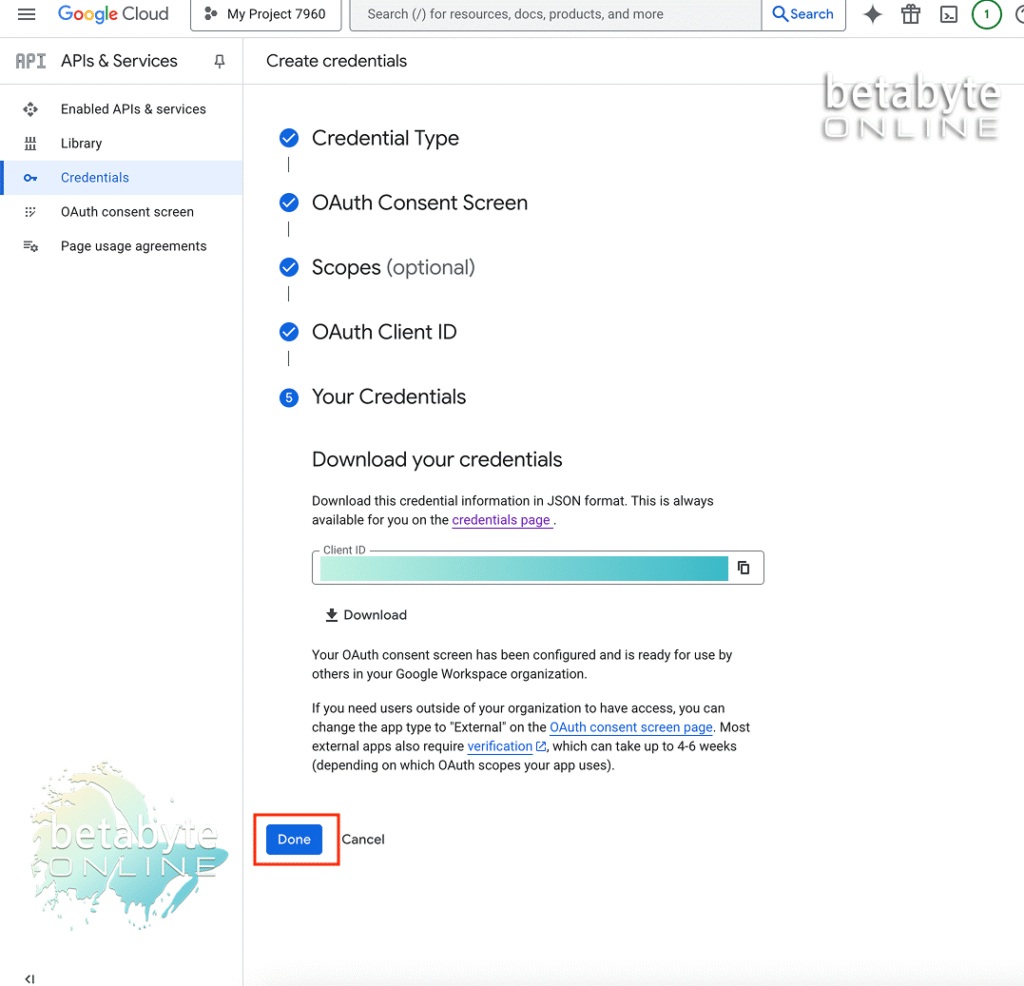
⚠️ Treat these like passwords. If they fall into the wrong hands, someone could impersonate your website and send malicious emails.
Click Done.
Step 10: Update Publishing Status from Testing to Production
By default, Google sets your app to Internal (Testing) mode. If you leave it this way, your app will be restricted to a small set of test users and will eventually expire. To make sure your app works reliably for your entire organization, you need to switch it to External (Production) mode.
Switch User Type
- In your Google Cloud Console, go to APIs & Services > OAuth Consent Screen > Audience.


- Under User Type, select Make External.

- Choose In Production because this mode allows the app to function without limitations and ensures your email integration works consistently across your site.

- Select Confirm.
Publish the App
Next, you’ll need to publish your app. Under the Testing section, click Publish App.
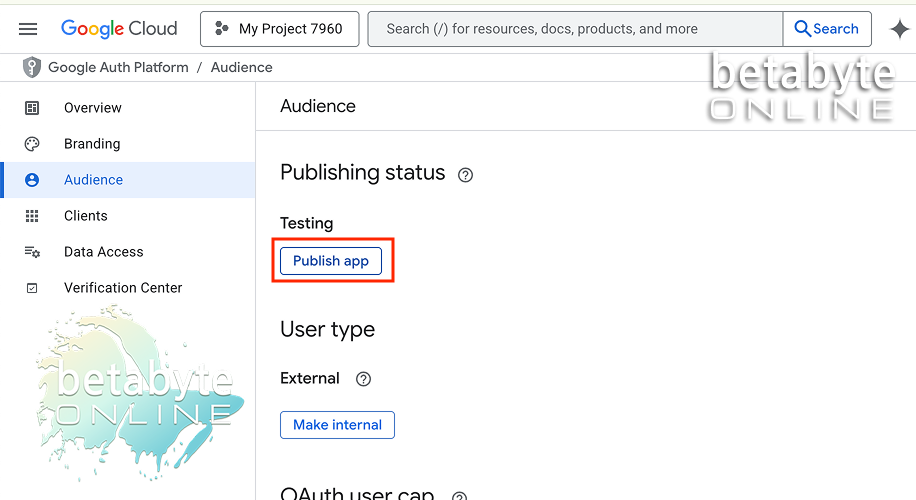
👉 This step is important because publishing finalizes the app’s status. Without it, Google may continue to restrict or time-limit the integration.
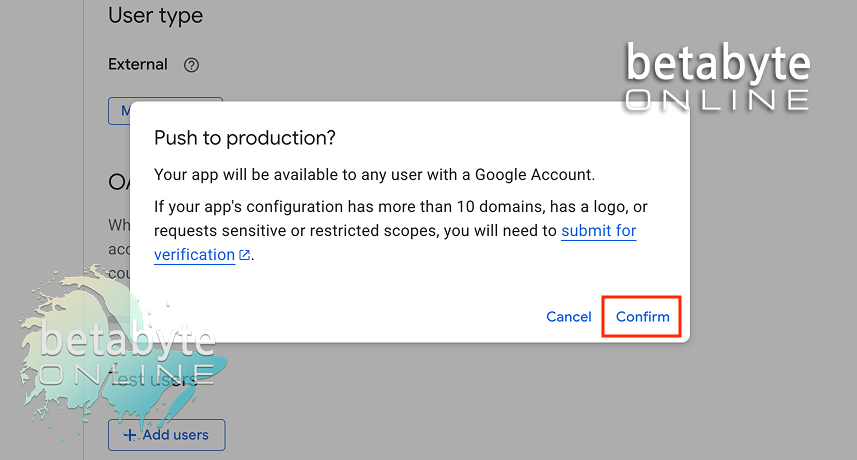
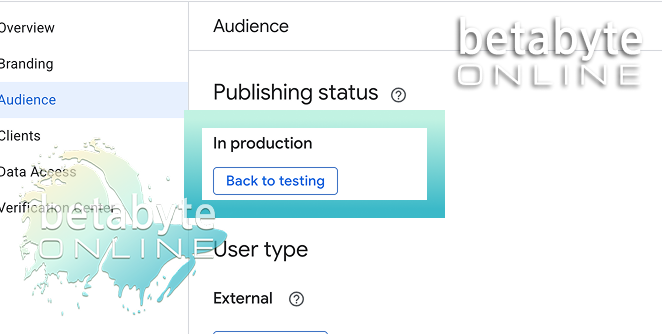
Once complete, you’ll see your app listed as In Production instead of In Testing — exactly where it needs to be.
Step 11: Connect WP Mail SMTP to Google
Open Your App Credentials
- Go back to the Google Cloud main menu.
- In the sidebar, select APIs & Services > Credentials.

- Open your Web Client 1 (or the client you created). Select the pencil icon to “Edit OAuth client”.

Copy Client ID and Secret
On the right side of this page, you’ll see your Client ID and Client Secret.
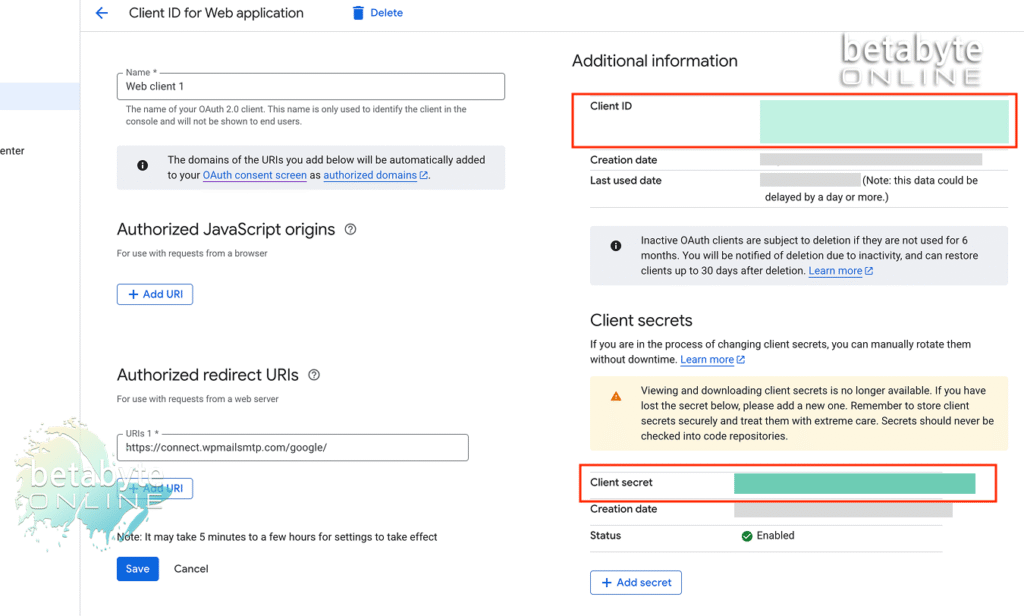
⚠️ Tip: Make sure your browser window is full-width — otherwise, these values can be cut off and hidden from view.
Copy both values.
Paste into WP Mail SMTP
- Go back to WordPress.
- In WP Mail SMTP > Settings, paste the Client ID and Client Secret into the corresponding Gmail fields.

- Click Save Settings.
Step 12: Authorize WP Mail SMTP
After saving, the page will refresh. At this point, you need to grant permission before Google will allow WP Mail SMTP to use your Gmail API.
- Scroll to the bottom of the WP Mail SMTP settings page.
- Click the button labeled Allow plugin to send emails using your Google account.

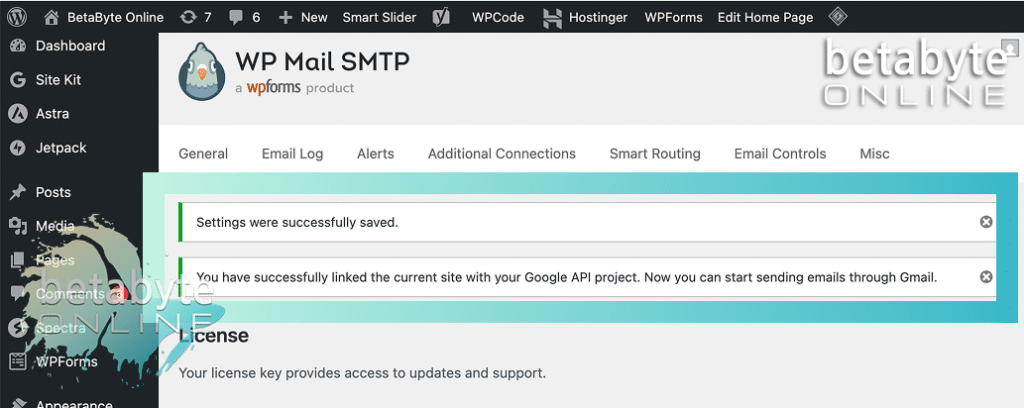
Once authorized, the settings will update and display:
“Connected as [your email address].”
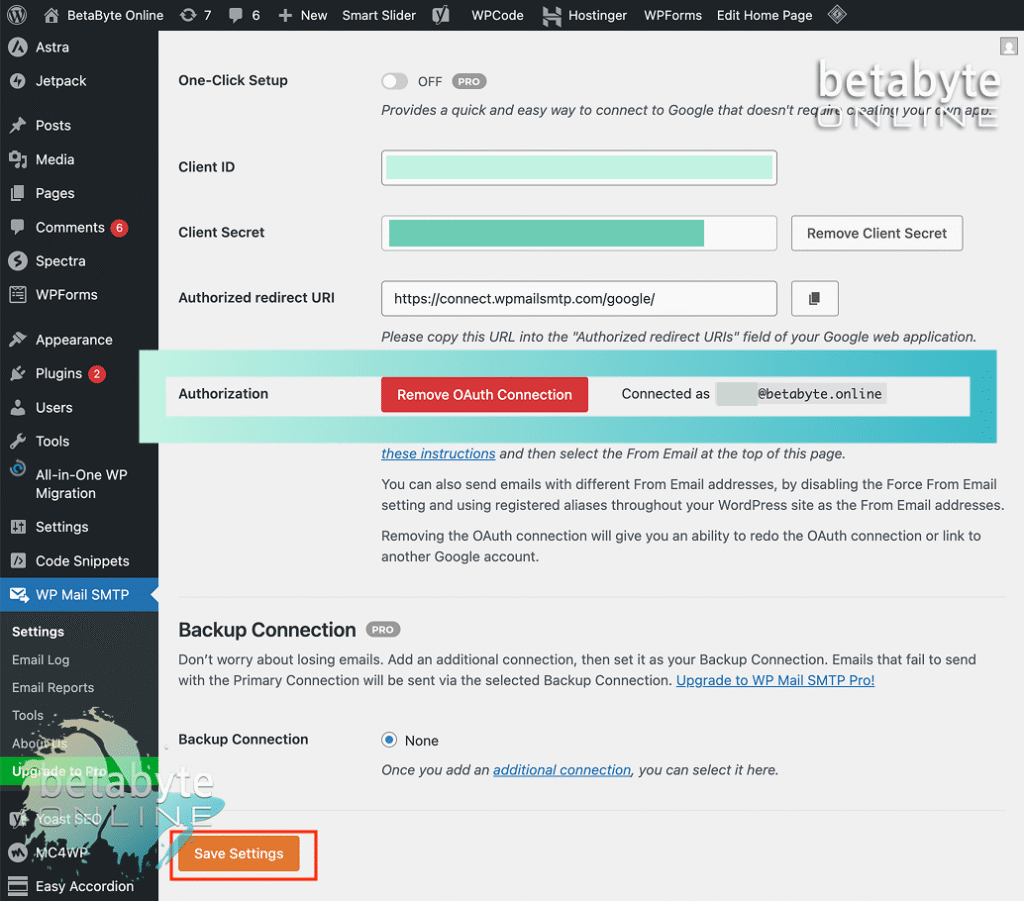
👉 If you see the option Remove OAuth Connection, that means the connection is live and working.
🎉 Congratulations! You’ve successfully created an OAuth connection between your Google app and WP Mail SMTP. This ensures Google recognizes your site’s outgoing emails, improves deliverability, and makes it far less likely your domain will be flagged as spam.